The tolerances for the dimensions and running accuracy of bearings are set out in ISO 492/199/582. This largely corresponds to DIN 620.
Accuracy of rolling bearings
Tolerances for dimensions: items necessary to mount bearings on shafts or in housings
- Tolerances for bore and outside diameters, ring and bearing width
- Tolerances for inscribed and circumscribed circle diameters of rollers
- Tolerances for chamfer dimensions
- Tolerances for width variation
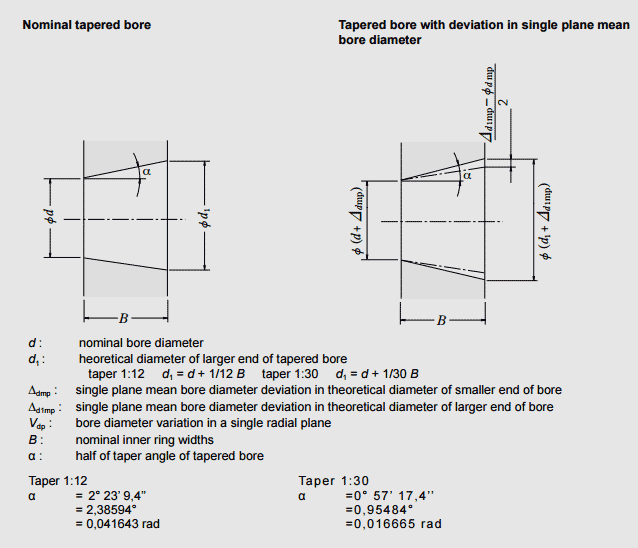
- Tolerances for tapered bore diameters
Running accuracy: items necessary to specify the run-out of rotating machine parts
- Permissible radial run-out of inner and outer rings
- Permissible face run-out with raceway inner and outer rings
- Permissible inner ring face run-out with bore
- Permissible outer ring variation of outside surface generatrix inclination with face
- Permissible raceway-to-back-face thickness variation of thrust bearings
Accuracy classes of rolling bearings
Apart from the standard accuracies defined by DIN/ISO, higher accuracies are specified by 6x, 6, 5, 4 and 2.
| Bearing types | Applicable tolerance classes | ||||||
|---|---|---|---|---|---|---|---|
| Deep groove ball bearings | Normal | Class 6 | Class 5 | Class 4 | Class 2 | ||
| Angular contact ball bearings | Normal | Class 6 | Class 5 | Class 4 | Class 2 | ||
| Self-aligning ball bearings | Normal | Class 6 | Class 5 | - | - | ||
| Cylindrical roller bearings | Normal | Class 6 | Class 5 | Class 4 | Class 2 | ||
| Needle roller bearings (solid type) | Normal | Class 6 | Class 5 | Class 4 | - | ||
| Spherical roller bearings | Normal | Class 6 | Class 5 | - | - | ||
| Tapered roller earings | Metric design |
Normal Class 6X |
- | Class 5 | Class 4 | - | |
| Inch design |
ANSI/ABMA Class 4 |
ANSI/ABMA Class 2 |
ANSI/ABMA Class 3 |
ANSI/ABMA Class 0 |
ANSI/ABMA Class 00 |
||
| Magneto bearings | Normal | Class 6 | Class 5 | - | - | ||
| Thrust ball bearings | Normal | Class 6 | Class 5 | Class 4 | - | ||
| bearings | Normal | - | - | - | - | ||
|
Equivalent standards (reference) |
JIS(1) | Class 0 | Class 6 | Class 5 | Class 4 | Class 2 | |
| DIN(2) | P0 | P6 | P5 | P4 | P2 | ||
| ANSI/ ABMA(3) | Ball bearing | ABEC 1 | ABEC 3 |
ABEC 5 (Class 5P) |
ABEC 7 (Class 7P) |
ABEC 9 (Class 9P) |
|
| Roller bearing | RBEC 1 | RBEC 3 | RBEC 5 | - | - | ||
| Tapered roller bearing | Class 4 | Class 2 | Class 3 | Class 0 | Class 00 | ||
Notes:
(1) JIS: Japanese Industrial Standards
(2) DIN: Deutsche Industrie Norm
(3) ANSI/ABMA: The American Bearing Manufacturers Association
The tolerances of the accuracy class “Normal” (P0) are sufficient for general applications in most cases.
| Bearing requirement, operating conditions | Examples of applications | Tolerance classes |
|---|---|---|
| High running accuracy is required |
VTR drum spindles Magnetic disk spindles for computers Machine tool main spindles Rotary printing presses Rotary tables of vertical presses, etc. Roll necks of cold rolling mill backup rolls Slewing bearings for parabolic antennae |
P5 P5, P4, P2 P5, P4, P2 P5 P5, P4 Higher than P4 Higher than P4 |
| Very high speed is required |
Dental drills Gyroscopes High-frequency spindles superchargers Compresors Centrifugal separators Main shafts for jet engines |
Class 7P, Class 5P Class 7P, P4 Class 7P, P4 P5, P4 P5, P4 Higher than P4 |
| Low torque and low torque variation are required |
Gyroscope gimbals Servomechanisms Potentiometric controllers |
Class 7P, P4 Class 7P, Class 5P Class 7P |
Measuring methods

| Running accuracy | Inner ring | Outer ring | Measuring point |
|---|---|---|---|
| Kia | rotating | stationary | A |
| Kea | stationary | rotating | A |
| Sia | rotating | stationary | B1 |
| Sea | stationary | rotating | B2 |
| Sd | rotating | stationary | C |
| SD | - | rotating | D |
| Si , Se | Only the shaft or housing or central washer is to be rotated | E | |

r: Chamfer dimension of inner/outer ring
r1: Chamfer dimension of inner/outer ring (front side) or the centre washer of thrust ball bearings
Remarks: The exact shape of the edge reduction results from the radius that is reduced in the area of the face and rolling surfaces. Make sure that there is no contact between the surrounding structure and the bearing in the area of the edge reduction. The radius here is smaller than the r (min) or r1 (min) value quoted in the bearing table. (According to DIN 616, ISO 15 and ISO 355.)
Tolerances for tapered bores (Class Normal)


